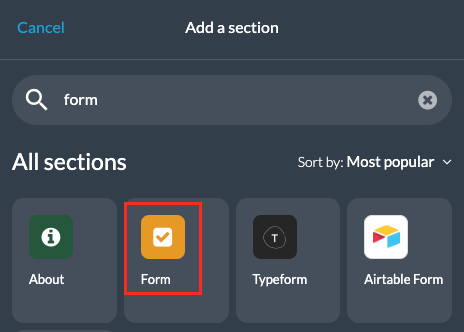
1. Add a Form section
1. In the left swipe menu go to My App > Content > Sections
2. Click the green button “Add a section” from the right column
3. Add your section by choosing “Form” in the content items.
4. Give it a title
5. Click “Add”
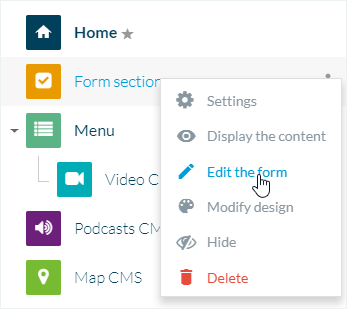
2. Set your form
1. Click the 3 dots in your sections list, then “Edit the form”.
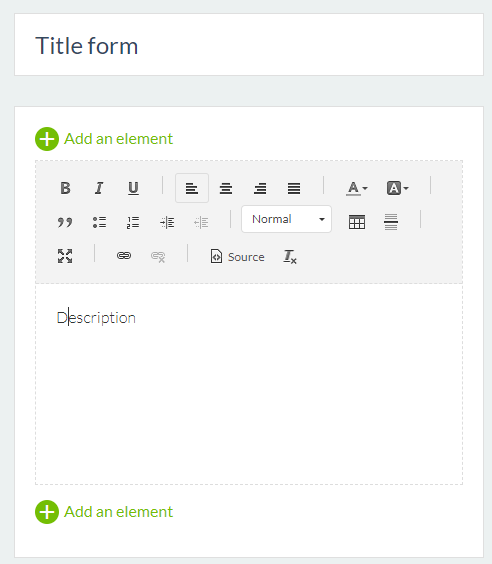
2. Fill in a title for your section
3. Fill in a description
3. Add fields to your form
1. Go to the builder, right column of your back office
2. Click on a block to add a field
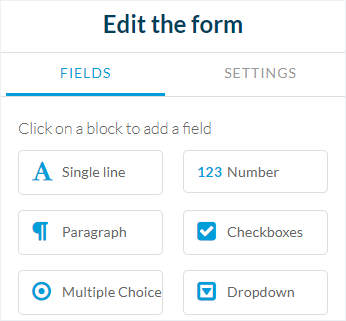
TYPE OF FIELDS
– Fields that allow your users to directly fill in the information (for example: “Single line”, “Paragraph”, “Name”, “Email”, etc.)
– Fields that let your users choose a response in a list or menu (“Multiple choice button”, “Dropdown menu”) or to select multiple responses (“Checkboxes”).
– Fields to fill in a date, time, address, or even a price.
– Field “Section Break” allows you to put space between two fields or to give a title to a portion of your form.SET FIELDS
1. Click an existing field or on a block to add a field
2. From the right column of your back office fill in:
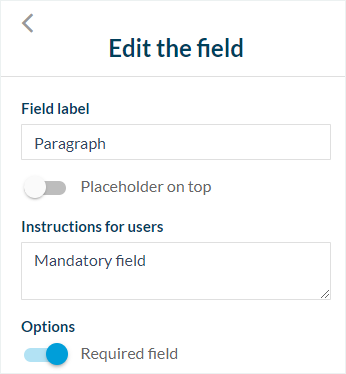
– Field label:
This is the title of the field, the one that will appear to your users. It is mandatory to fill this out.
By default, this will appear inside the field, but you can choose to place it above the field by setting the “Placeholder on top” button to “on”. – Instructions for users:You have the option to give supplemental instructions to your users, that will appear underneath the field. You can choose not to do this, it is not mandatory.
– Options:
If you set the “Required field” button to “on” in a field, the user will not be able to send in the form if this field has not been filled out.
As soon as the “Required field” is set to “on”, an asterisk will appear next to the field.
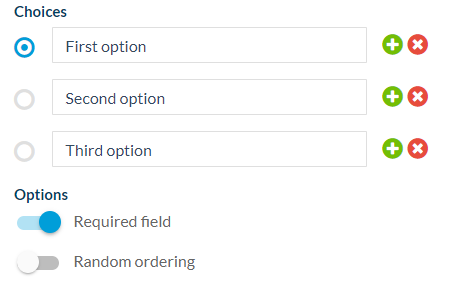
4. List of choices fields
In the fields where you can make a list of choices (“Multiple choices”, “Dropdown menu”, or “Checkboxes”) you can add or delete choices (by clicking the + or x).
Random ordering option:In the “Multiple choice” and “Checkboxes” fields, you can activate the “Random ordering”.
If this is activated, the field choices will appear in random order each time the user opens the form.
5. File fields
The “File” field lets your users send photo, video or PDF files.
You can personalize the “send” button by editing the text under “Upload button”.
Note: The upload of PDF file is not available on the iOS native version.

6. Fields layout
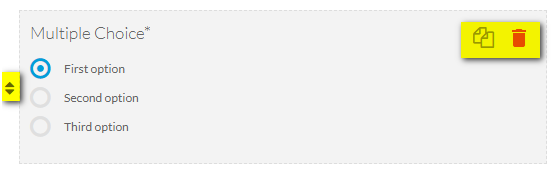
-To duplicate a field: click the duplicate icon next to the trash icon.
-To delete a field: click the red trash icon.
-To move a field: drag and drop it using the arrows.
To edit a field that has already been created
1. click it from the main column
2. Set it from the right column
You also have the option to create paragraphs, like in a CMS section.
7. Settings tab
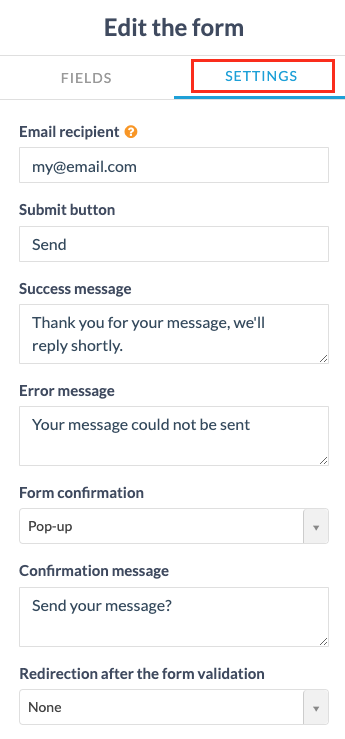
1. Email recipientFill in your email address to receive a notification each time a user sends in a form.
2. Submit button
This is the button found at the bottom of the form that allows the user to validate their submission. You can personalize the message.
3. Success message
This message will inform the user that the process is complete.
4. Error messageThis message will appear if an error occurs when the user sends in the form.
5. Form confirmation
Select from the drop down menu if you wish a confirmation from your user before sending the form:
None: No confirmation, users will submit their form by clicking on the send button.
Pop Up: it shows up on the user’s screen when they send in a form.The user needs to reply ” yes” to confirm the submission or ” no” to return to the form.
Preview: when users click on the “Send” button, the preview page will display the entirety of their answers.
They choose to go back and change an answer or to continue and send their form by clicking on the confirmation button at the bottom of the page.
6. Confirmation message
This is the message to ask the user to confirm that they want to submit the form.
7. Confirmation button
This is the text displayed on the confirmation button.
8. Design of your form
You can design your form section from the menu My app > Design > Sections
Beware: don’t set the “Background of the button” color to white or your checkboxes will be checked in white and you will not be able see it. Make sure you choose a different color than white for this setting.
9. Retrieve form’s answers
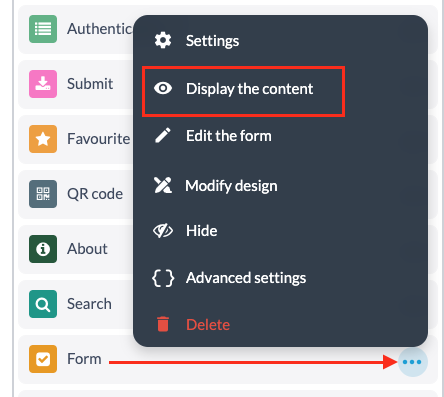
1. Go to the menu My app > Content > Sections
2. Click “Display the content” from the section list on the right column of your back office
1. Export the data by Clicking “Export data” button, you’ll get a .csv file to open under UTF8 format
or
2. Click a specific line in your back office to see the answer to the form

10. Edit an existing form
1. In the left swipe menu go to My App > Content > Sections
2. Click the 3 dots in your sections list, then “Edit the form”
3. Edit your form
4. Click “Publish” at the bottom of the page
5. Update your modifications in the menu Publish > Changelog


