You can connect an external calendar source to your app.
Warning: we don’t display past or recurrent events, this applies to all sources.
1- From the left swipe menu, click on My App > Content > Sections
2- Click on “+Add a section ”
Click here for more information on how to create sections for your app.
3- Click on the “Load More” button for new options to show up
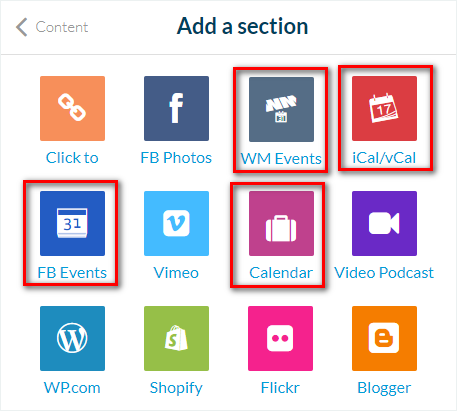
4- Choose one of the available services to display your events.
Note: If you have technical skills, you can also use the Custom Calendar.
This option is for developers only. For more information, please read about creating custom feeds. You can choose between 5 types of services to display your events:
1 – Google Cal
2 – iCal/vCal
3 – FB events
4 – WM Events
5 – Custom Calendar
1. Connect a Google Calendar
1- Fill in a title for the section
2 – Save to request an access to the service;
3- Confirm authorization to return to your back office
4- Complete the procedure.
5- Select which calendar you want to display from the various options in the application.
Warning: Google doesn’t allow the display of several calendars on the same section. If you add a tab “All categories” to your Google calendar section, it will show an empty section. If you have many calendars, display your calendars one by one by using the filters.
2. Connect a iCal/vCal feed
1- Fill in a title for the section
2- Paste your URL feed in the Settings field.
3. Connect Facebook events
1 – Fill in the title of the section
2 – Paste the Facebook URL of your event section in the Settings field.
4. Connect a calendar with WMaker Events
1- Fill in a title for the section
2- Fill in the URL of your WMaker Events site
3- Fill in your Account ID
4- Fill in your Password
5. Connect a custom feed (customized source – Calendar)
1- Fill in the title of the section
2- Paste your custom URL feed in the Settings field.
Warning: Make sure your custom feed respects the specifications of the Content API.
6. List view display options
This setting controls the display for the list view of your events.
1. Go to the menu My App > Design > Sections design
2. Click your event section from the section’s list
3. Click “Edit Events list”
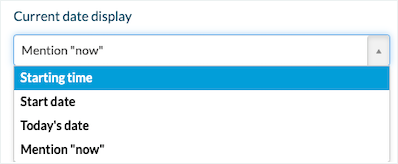
Date list view options
Starting Time: This will display the specific start time of the event if it is not an all day event.
If the event is an all day event, then it will show icon “24” indicating the event is all day.
Start Date: Used for events that span multiple days or one day event.
It will display the start Date of the event even if you are into the second date. (For example if the event is 6/8/19 to 6/10/19 and the current date is 6/9/19, it will always display 6/8/19).
Todays Date: Used for events that span multiple days or one day event.
It will display the current date of the event (For example if the event is 6/8/19 to 6/10/19 and the current date is 6/9/19, it will always display 6/9/19).
Mention Now: Will display “Now” instead of the date if the date is occurring today.
The upcoming dates will still be shown with the date.