The Sections are the basis of your The App Match application.
– To create and manage the sections of your application go to the left menu My App > Content > Sections:
The sections of your app are listed on the right side of the backend.
– Order them by drag and drop in the list.
– To access the settings of the section, its design, content, to hide it or to delete it:
Mouse over the section and click on the 3 dots at the end of the line
Some default sections are already displayed when you create your app, to give you an idea of the general look of your app.
They are listed as “Demo” content. You will have to delete this content or replace it with your own before you publish the app.

1. Add a new section
1. Go to the menu My App > Content > Sections
2. Click the green button “+ Add a section” from the right column
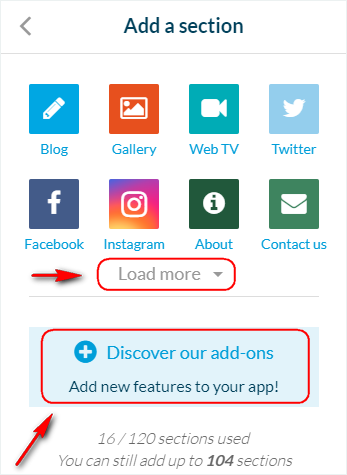
3. Select the type of section from the list displayed*
* At the top of the list are displayed the most popular types of sections.
Click on “Load more” to display the whole list of sections offered in The App Match.
You can add up to 120 sections to your app.
You see how many you have left at the bottom of the column.
2. Delete a section
There are 2 ways to delete a section.
– From the Sections menu :
1 – Mouse over the section
2 – Click on the 3 dots at the end of the line
3 – Select the red trash can icon
4 – Confirm your choice
– From the Settings menu of a section:
1 – Place your mouse over the section
2 – Click on the 3 dots at the end of the line
3 – Get into the Settings menu
4 – Click on Delete at the bottom right of the screen
5 – Confirm your choice
3. The different types of sections
1/ CMS (Content Management System) section
The CMS sections give you the possibility to create your own content directly into the app (articles, photos, videos, calendar, map and audio). These are the Blog, Gallery, Web TV, Map, Calendar and Podcasts.
2/ Other sections where you can create or manage content directly from the app:
– About sections allow you to create one single page of content.
– Contact us section allows you to provide your users with a list of contact information, so they can call a number or contact you by email in one click directly from the app.
– Form sections allow you to create a form from scratch and get data from your users.
– Submission section allows you to give your users the possibility to share content with you through the app. You can share the content sent by your users directly into a Blog section afterwards.
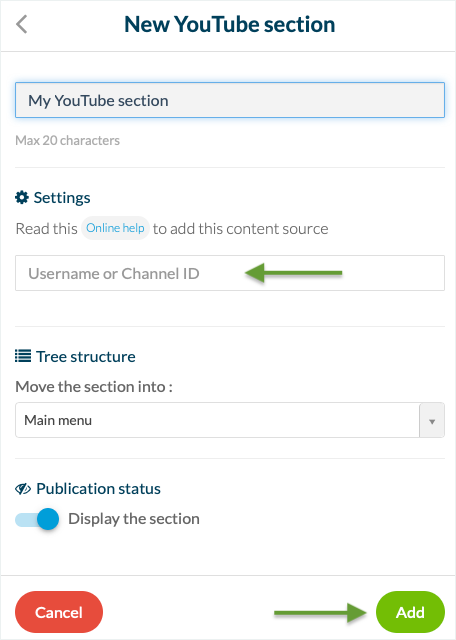
3/ Connectors
They get the content from an external source you provide in the Settings and display it in your app.
For example, to display articles that come from your WordPress blog, you can choose to add a section and then select the WordPress connector in the list of sources available. To display videos coming from your YouTube channel, add a new section and then select the YouTube connector in the list.
4/ Various
– The Menu section, to create extra navigation levels in your navigation
– The Click-to section, for external and internal links as well as calls to action
– The Search section, to include a search engine into your app
– The Settings section (recommended)
– The QR code section, to include a QR code reader into your app
– The Favorite section, so your users can save some content and find it easily later
– The HTML section, a section you can create from scratch using your own HTML code (advanced users only: we kindly remind you that we do not debug external code).
5/ Add-on related sections
Some sections require the activation or purchase of an add-on in order to be displayed in the app.
Click on the blue area inviting you to “Discover our add-ons” and see the help about the Add-On store for more information.
6/ Custom sections
At the very bottom of the list of sections, you can find sections labeled as “Custom”.
These sources are for developers only, as using them requires technical knowledge.
Choose the type of section (Article, Photos, Videos, Calendar, Map or Sound) and create your own custom feed from your external content source
4. Management of the sections
Once you have selected a type of section:
1. Give it a title
2. Fill-in the required settings if needed
3. Click “Add” at the bottom right
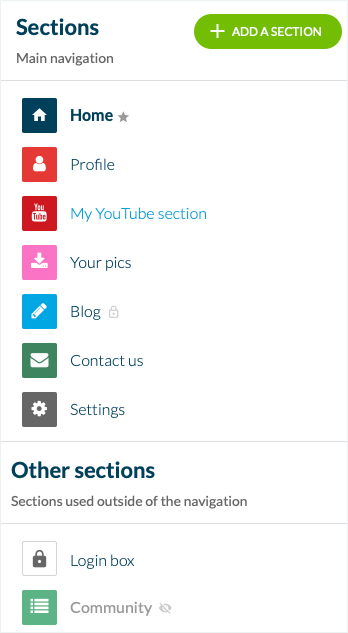
– By default, any new section is added the top menu Sections – Main navigation.
These sections are displayed in the main menu of your app.
– Drag and drop sections into the bottom menu Other sections – Sections used outside of the navigation to remove them from the main navigation menu of the app.
These sections can be made accessible to your users through internal linking (to a specific section or article for example), without being part of the main navigation.
– Sections can be dragged and dropped at any time from a menu to another, depending whether you want them in the main navigation or not.
Note: Hiding a section that is placed in your main navigation will automatically place it (as a hidden section) in the Other sections menu. When you make it visible again, it will automatically be placed back into the Sections – Main navigation menu.
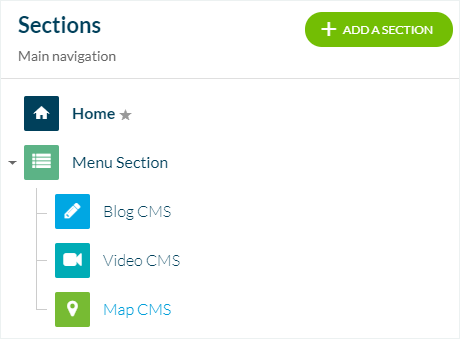
5. Create multi-levels of content
Some sections allow you to add extra navigation levels to your app:
– extra categories to organize the content of the CMS sections,
– filters for the content of external sources (example: YouTube playlists),
– sections organized under a Menu section
Warning: Regardless of the number of categories or filters in a given section, it still counts as one section.
However, the Menu section and each section placed under it count as an extra section: If you add a Menu section and place 3 sections under it, it counts as 4 separate sections.
Keep that in mind as the global limit of sections of the app is 120.